Dendroboard banner

Fly proofing a Euro sliding door viv

27K views 30 replies 9 participants last post by  eMCRay  
#1 ·
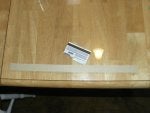
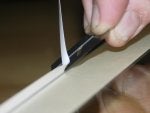
A quick thread on how to simply fruit fly proof your Euro style, sliding door, vivs. There was a link I saw for this but it was translated pretty badly from another country. Cutting the proper groove into a credit card makes it so simple. The first one takes a little bit of work to get right but then they only take minutes each for any others. Here is the shape we want to cut the card.
 

Attachments

#2 ·
You can use a drill or dremel tool, with an 1/8" drill bit, to get a perfectly rounded bead. I held the Dremel between my knees and simply pulled the card into the spinning bit until it was as deep as my vivs required. As I was working on Protean vivs, mine required just under a 1/8" deep groove.
 

Attachments

#29 ·
I just bumped this, and figured I should make a clarification. I would never spend money on a Protean vivarium. I have never spent money on a Protean vivarium. I was given 5 brand new, Protean vivariums that were not usable as delivered.
I don't want somebody to see that I had a Protean, and take that as a recommendation.

This is not a Protean thread. No more mentions of Protean, please. We don't want this locked down.
 
#7 ·
Time to put that card into action. Carefully line it up at the start of your bead and just run it right down the entire bead. Do not stop. You need to do it while the bead is nice and fresh. If you taped it up right, and cut the bead right, this will be extremely easy. One quick swipe down the edge.
 

Attachments

#8 ·
You will notice the excess silicone bunching up on the back and it may get on you but keep going till the end of the bead. The tape will contain the mess. Besides, you were prepared to wipe up silicone when you started this, right? One of my rules in the window business is that you never pick up a tube of silicone without grabbing the paper towels.
 

Attachments

#10 ·
The ends may not be quite perfect but that does not matter at all. After it drys, you have to slice about 1/8 to 1/4" off anyway, so that it can slide up into and down into your door tracks.
 

Attachments

#11 ·
I carefully pull the tape off while the silicone is still wet and Walla! Here is your completed bead. Perfectly straight and uniform. If you did it right, it will look manufactured. It should look like the most perfect bead of silicone you have ever seen. And best of all, now you can repeat the process on all your Euro vivs quickly and simply.
Let it dry 24 hours before trimming off the bit at the ends that I already mentioned. I'll get a picture of it installed after it is dry.
 

Attachments

#14 ·
Really nice tutorial Doug, thanks!

Over here and in Europe this product is pretty popular for FF proofing sliding doors, E.N.T. Terrarientechnik - Terra-Safe Terra-Safe Silikonnaht fr Schiebetren, 1,6 mm TS7778

But in my opinion, your silicone bead looks much cleaner!

Any photos of how it looks once the doors are in place?

The silicone tape seems to go cloudy after its been in use for a while which really annoys me, so I think I'll give your method a go.

Regards,
Richie
 
#16 ·
It should be noted that while laying the silicone itself down that even though you can be as messy as you want, you should at least try and get an even amount of silicone down the whole length of the door because it will result in a much better strip in the end. This can easily be achieved by holding your finger at the edge and running it down the edge slowly while laying your silicone down, also do not stop or change pressure on the gun as you go along since this would also result in an uneven amount in the end.

Also if any German reader comes along, here is the original thread which also contains a link to the instructions in German http://www.dendroboard.com/forum/pa.../forum/parts-construction/47105-easy-way-make-silicone-strip-sliding-doors.html
 
#17 ·
Thanks, that is the original thread I used. It is important to make sure you get enough silicone on for a good bead or you will get some air bubbles but it's ok to have too much as you card will scrape any excess away.
 
#19 ·
I know how to fix this, it is very simple. Place a piece of masking tape lengthwise down the outside of the tank to cover the gap between the doors, and add two pieces of tape to the edges of each door along the inside. The inside tape should go as close to the flat edge of glass as possible, but not to where it is sanded and sloping. Fill the resulting channel with silicone, remove tape, let dry, cut one edge free with sharp razor blade. Do the same in the corners between side glass and doors.
 
#24 ·
It will take you a few tries to get this just right, but when you do, it is worth it. It makes for a very clean looking silicone gasket.
Remember...silicone shrinks as it dries! You will need to make your bead bigger than you think as it will shrink a good bit. Once you get it perfect, save that card!! It can now be used to run the same, perfect bead, viv after viv.
 
#25 ·
I really hate digging up old threads, but I made another one of these strips today and tried something new while making it. Instead of using any tape at all I just laid down a nice thick line of silicone using the finger guide trick I mentioned earlier in the thread, once the silicone was in place i gave the whole thing a misting then grabbed my card and slid down the door very quickly with it.

The method I used today with the water was through advice I got from a friend of mine, which leaves you without any bubbles (I have had them form) or ridges to give you a nice clean smooth strip, as smooth as a freshly shaved pair of legs and by not using the tape there is no room for the tape pulling any silicone away. If anything is left over (smears) you can scrape it away with a razor the next day.

I have never been more happier with these strips until today!
 
#26 ·
hello all
on the exo and zoos you can run a small bead along the edge of the doors, then get a single edge razor blade from your local home store, or if you're like me you have them already, they have a small notch on each end of the blade, a slight mist of water on the bead then at a 90 degree angle to the edge of the door with the notch cradling the edge of the glass and one non stop bottom to top move and the notch will leave a rounded bead on the edge of the door, i do this on both door edges.

Regards Jerry
 
#27 ·
PS
Don't know if anyone has already said anything on this subject but, you can fly proof the bottom vent on the exo and zoos by removing the back side of the vent, once done " be careful" you can go to HD or Lowes and in the ac filter area they sell black ac filter foam, you can cut little pieces of it and put it into the cannel that is behind the piece that you removed then put the piece back on. This keeps the ff in and still lets air pass through for ventilation!

Regards Jerry
 
#30 · (Edited)
I do have two small additions to this one!

1) If you want the groove to be a bit further from the edge (for whatever reason - bigger overlap in the doors, etc.) you can add a "guide-ridge" to the card, like so:

Image


2) If the silicon ridge is too big (and seals completely) the other glass door will get smudged or the doors will be too difficult to open. If it is too small / just right then you will still get some FFs that escape, especially smaller ones.

SO, to avoid the smudging and for added FF-proofing, I've recently started adding a SECOND ridge on the other door, like this:
__
V
^__

It's barely visible once closed but definitely helps with keeping in FFs. In the pic below you will see two ridges - they are both pointing at each other so will actually press against each other when the doors are closed leaving literally NO gap. When they are open they do not touch the other pane, therefore no smudges / easy to open. Don't mind the terribilis...

Image