
Ok so I've been doing this method off and on in some tanks for the last few years without incorporating a pump/drip wall...and now I've started doing that. I've talked about the basic method on here lots of times but I don't think I've ever made a thread about how to do it so here goes...
Basic concept...
Silicone and/or foam pieces of cork in a pattern that makes it look as if its been "shattered". Keep the cracks between each piece around an inch or less. (pieces thicker then most cork tiles are best for holding moss) and then jamming exoterra forrest moss and/or sphagnum moss into the cracks. You can also add peat, coco bark, and other stuff. The idea is to keep this moist through misting or drip wall and allow living moss to take over the cracks, probably eventually the cork also. The cracks provide places to root plant cuttings. You can also foam/silicone in pots or pieces of cork tubes as planters.
2 choices- First you can just silicone pieces of cork right to the back glass, you can also incorporate pieces of drift wood into the design if you'd like. 2nd You can first silicone a coco mat or something like epiweb to the glass then silicone/foam cork into place over that. This may have the benefit of keeping more water in the actual wall and allow for a thinner dammed off drainage area (which I'll explain). Especially with the coco mat is probably not wise to add heavy drift wood directly to the mat as eventually the mat will pull away from the glass. You can cut the mat to go around drift wood pieces siliconed to the glass.
In my first tanks with no drip wall the drainage dam wasn't needed but now that I'm doing drip walls I needed something to keep the drip from saturating the entire substrate or at least getting it wetter then I wanted given the plants I'm using.
This basically consists of a dam around 2 inches high running the length of the drip wall at its base, usually filled with gravel. This is so the water runs straight through the wall and into the false bottom or leca/hydroton layer. This has the added benifit of decreasing the leaching of tannins into a pond area if your pond shares its reservoir of water with the false bottom as mine often do. If you do that and fill it from the pond area and don't over mist you wont get as much tannins in your water, nor as fast an accumulation.
Ideally you will plumb your drip wall in before adding the moss. It can be done after if you forget but it is harder to hide. For my drip walls I am using Tom's lifting pumps with the out put line going to a "T" at the top middle of the wall and 2 lines coming off the "T" with holes punched in them. Intake line is hidden in background and goes to pond section. If your pond is large enough you can use the Tom's prefilters to extend pump life and help prevent clogs. If not you can wrap the end of tube in some kind of filter material and rubber band it, glue it into place...whatever. Basically you just want to prevent large particles from entering the pump.
Ok on to the pics...I think these are pretty self explanatory after the info I've just given but if there are any questions, fire away. I did add some further comments though.
![Image]()
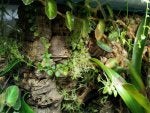
20H, Has a tree fern tile siliconed into place with small fern and moss growing meant to spread through the background
![Image]()
This one clearly shows the plactic strip used as a drip wall dam. Its a lil to short in middle, I'll have to fix it. Basically you just want to slope the substrate up from that towards the center of the tank so it isn't visible. In this pic its a 10gal, and I used a coco mat on the back glass first, so I may be able to get away with piling the substrate right up against the drip wall since most of the water will run down the back glass and coco mat and only a small/slow amount will wick into the main substrate. Drip wall is run on timer and usually just enough to keep the wall moist, not soaked.
This pic also shows pretty clearly how I do my ponds usually. Unless it is a large pond in a large tank I don't see much point in completely separating it from the false bottom especially since doing it this way greatly slows down evaporation and how often you have to add water to the system. It may look sealed off but water will run or wick through to fill the pond. If I actually managed to completely seal it without trying I'll poke holes through the foam base under the shore so water flows into the pond.
Unfortuately the only old tank I still had running using the basic method was an overgrown 10gal where the plants had mostly blocked light from hitting the background so I didn't have good growth, plus with no drip wall without frequent misting it dried out. Here is a new hex that is starting to grow in and if you use your imagination you should be able to get an idea of the potential effect (It should eventually be a solid mass of green except for some visible cork and all the flowers from plant types I used)....
![Image]()
I did not use the full drainage dam idea here hence the extra tannin load and rapid rate of tanning leaching. I did put extra gravel around the edges under the drip wall but it wasn't enough. This tank is currently being completely flushed several times and large amount of activated charcoal used to clear the tannins to an acceptable level.
Please keep in mind that all these tanks are new, and only seeded with small moss samples and not fully planted at best...LoL they will be awsome...eventually")
Questions?...Comments?
Basic concept...
Silicone and/or foam pieces of cork in a pattern that makes it look as if its been "shattered". Keep the cracks between each piece around an inch or less. (pieces thicker then most cork tiles are best for holding moss) and then jamming exoterra forrest moss and/or sphagnum moss into the cracks. You can also add peat, coco bark, and other stuff. The idea is to keep this moist through misting or drip wall and allow living moss to take over the cracks, probably eventually the cork also. The cracks provide places to root plant cuttings. You can also foam/silicone in pots or pieces of cork tubes as planters.
2 choices- First you can just silicone pieces of cork right to the back glass, you can also incorporate pieces of drift wood into the design if you'd like. 2nd You can first silicone a coco mat or something like epiweb to the glass then silicone/foam cork into place over that. This may have the benefit of keeping more water in the actual wall and allow for a thinner dammed off drainage area (which I'll explain). Especially with the coco mat is probably not wise to add heavy drift wood directly to the mat as eventually the mat will pull away from the glass. You can cut the mat to go around drift wood pieces siliconed to the glass.
In my first tanks with no drip wall the drainage dam wasn't needed but now that I'm doing drip walls I needed something to keep the drip from saturating the entire substrate or at least getting it wetter then I wanted given the plants I'm using.
This basically consists of a dam around 2 inches high running the length of the drip wall at its base, usually filled with gravel. This is so the water runs straight through the wall and into the false bottom or leca/hydroton layer. This has the added benifit of decreasing the leaching of tannins into a pond area if your pond shares its reservoir of water with the false bottom as mine often do. If you do that and fill it from the pond area and don't over mist you wont get as much tannins in your water, nor as fast an accumulation.
Ideally you will plumb your drip wall in before adding the moss. It can be done after if you forget but it is harder to hide. For my drip walls I am using Tom's lifting pumps with the out put line going to a "T" at the top middle of the wall and 2 lines coming off the "T" with holes punched in them. Intake line is hidden in background and goes to pond section. If your pond is large enough you can use the Tom's prefilters to extend pump life and help prevent clogs. If not you can wrap the end of tube in some kind of filter material and rubber band it, glue it into place...whatever. Basically you just want to prevent large particles from entering the pump.
Ok on to the pics...I think these are pretty self explanatory after the info I've just given but if there are any questions, fire away. I did add some further comments though.


This pic also shows pretty clearly how I do my ponds usually. Unless it is a large pond in a large tank I don't see much point in completely separating it from the false bottom especially since doing it this way greatly slows down evaporation and how often you have to add water to the system. It may look sealed off but water will run or wick through to fill the pond. If I actually managed to completely seal it without trying I'll poke holes through the foam base under the shore so water flows into the pond.
Unfortuately the only old tank I still had running using the basic method was an overgrown 10gal where the plants had mostly blocked light from hitting the background so I didn't have good growth, plus with no drip wall without frequent misting it dried out. Here is a new hex that is starting to grow in and if you use your imagination you should be able to get an idea of the potential effect (It should eventually be a solid mass of green except for some visible cork and all the flowers from plant types I used)....

I did not use the full drainage dam idea here hence the extra tannin load and rapid rate of tanning leaching. I did put extra gravel around the edges under the drip wall but it wasn't enough. This tank is currently being completely flushed several times and large amount of activated charcoal used to clear the tannins to an acceptable level.
Please keep in mind that all these tanks are new, and only seeded with small moss samples and not fully planted at best...LoL they will be awsome...eventually
Questions?...Comments?