
I have had a few requests concerning the method of construction regarding a european type front opening viv. So I have put together the follow detailed instructions, as one of my fellow british froggers said, this is the idiots guide to constructing a viv.
I hope that you will find these useful.
I post each new section as I complete typing and doing the drawings.
This will be available in PDF format when complete.
DIY Glass Open Front Vivarium
By Darryl Le Grange
Introduction to Building Your Own Vivarium
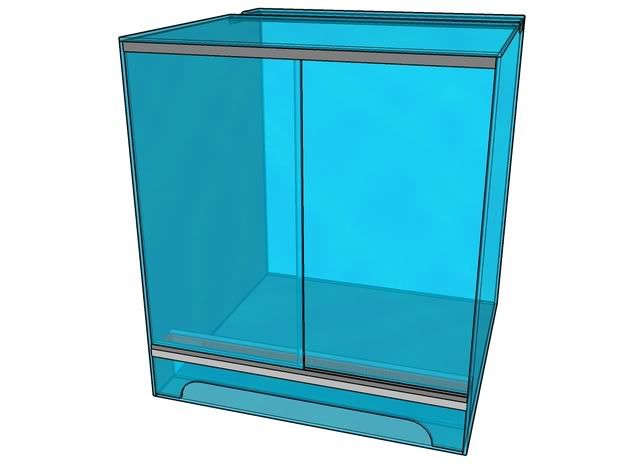
If you want to try, building an open front vivarium from scratch, you will find this a challenge and satisfying as well. I have attempted to try and document this process as accurately as possible, from tips, materials list, pre-assembly instructions, and complete step-by-step directions on how to construct an open front vivarium from 4 mm glass.
Tips on Working with Glass
• Plan ahead: Prepare good schematic drawings, before cutting the glass. >> See Cut Size Calculator
• Insure a correct fit by using accurate measurements.
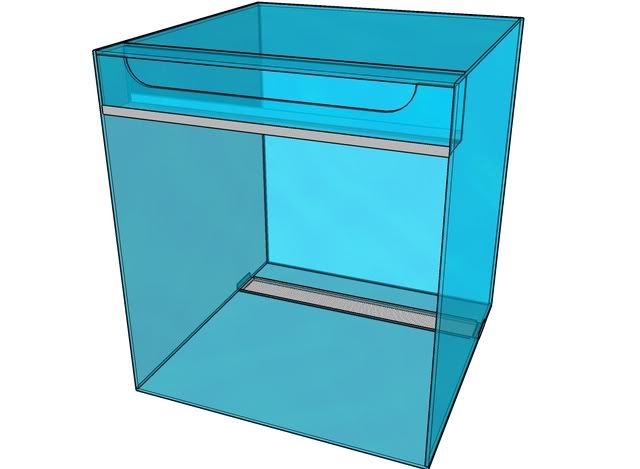
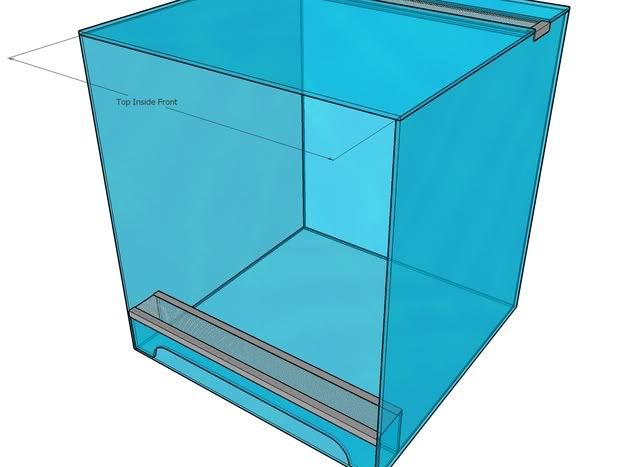
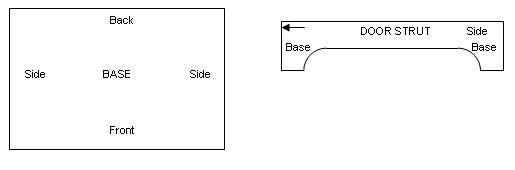
• I construct my vivariums with the two side pieces of glass and the back piece to fit on the outside of the base and the front door strut set on top of the bottom base sheet of glass. >> See Panel Placements Diagram
• Have a professional glazier cut and prepare your glass if you do not feel comfortable with cutting glass.
• Lightly rubbing down all the edges on the newly cut glass, with the emery cloth helps prevent small chips and you cutting yourself.)
• If at any time during construction you have trouble with the tape not sticking to the glass, just clean the area with some acetone on a paper towel and try again
• Use a glass pencil or a Marker pen to note the orientation on each piece of glass.
• Drill any holes for drainage and misting systems before assembly
Materials List
The glass components consist of 1 bottom, 1 back, and 2 sides, 2 top pieces of glass, 1 door strut, 1 retaining lip and 2 doors. (Optional – 1 False Base)
You will also need the following items to construct your vivarium.
• Sturdy, flat and non-abrasive surface to work on
• Single edged razor blades
• Acetone or methylated spirits
• A non-toxic 100% silicone sealant (Aquarium Grade)
• A roll of paper towels.
• A Glass pencil or marker pen.
• A roll of duct tape or a good quality masking tape
• Emery cloth or silicone carbide sandpaper.
• “E” profiled plastic (4mm) strips (Door Channels)
• “L” profiled plastic angle strips
• Fine Stainless Steel Mesh
• Small block of natural bees wax
• Good pair of kitchen scissors
• Thin latex or similar gloves
• Small Right-Angle or Engineers square
• 1x Large wooden Block or cloth covered Brick
• Small amount of dishwashing soap and water
• Small Polystyrene blocks (for optional False Base)
Pre-Assembly Preparations
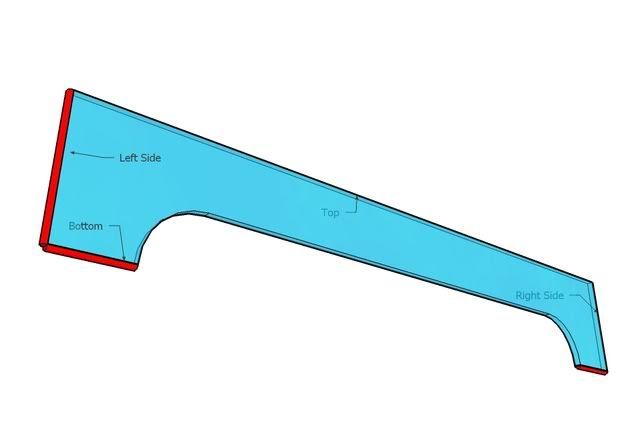
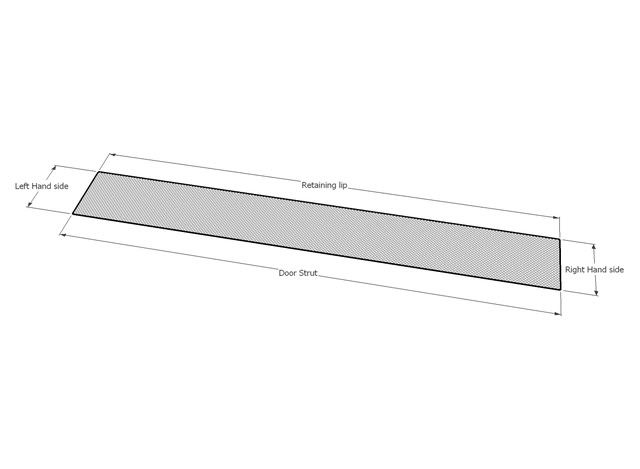
• The door strut has an arch cut out of it, you can cut this free-hand or use a template, otherwise have this piece of glass cut by your local glazier.
• Once the pieces of glass are cut, using the emery cloth or silicone carbide sandpaper, buff all the raw edges of the glass just enough to take off the sharpness.
• Clean all the glass pieces joint areas and edges (any area where silicone will be applied) with acetone or methylated spirits.
• Cut strips of tape, at least 16 – 18 pieces, about 120mm long. Stick these to a clean surface, which the tape won't stick too much to, with at least half of the tape hanging freely. If you require more tape, cut these before installing another piece.
BEFORE you start to assemble your vivarium, it is important to know in what sequence the glass sheet are assembled.
The sequence is as follows:
1. Base
2. Back
3. Left Side
4. Inside Retaining Lip
5. Door Strut
6. False Base (Optional)
7. Right Side
8. Top “Back”
9. Top “Front”
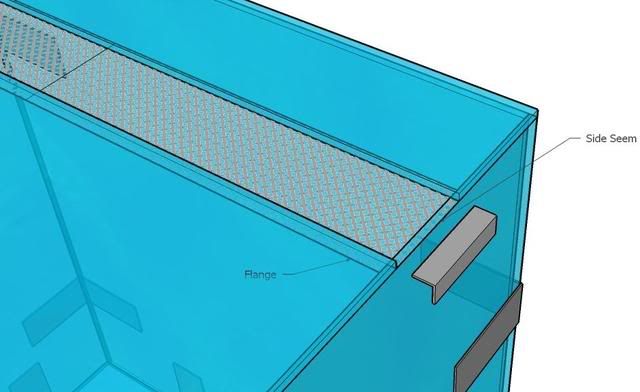
10. Stainless Steel Mesh
11. Plastic Angle
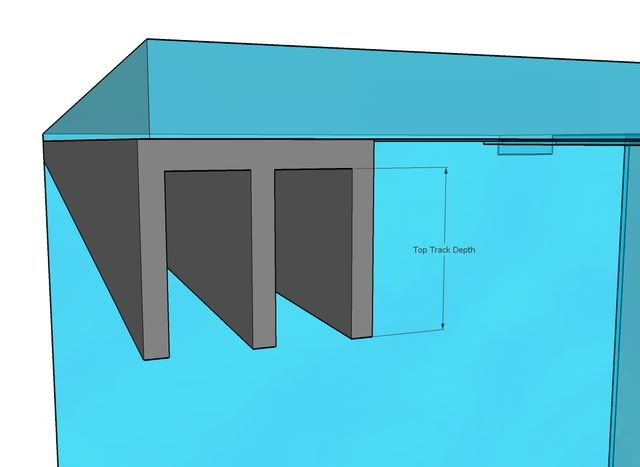
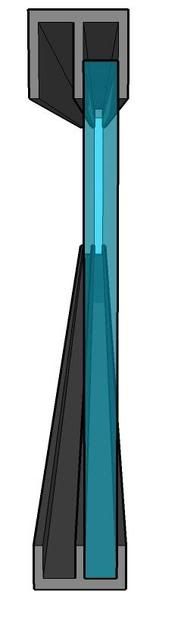
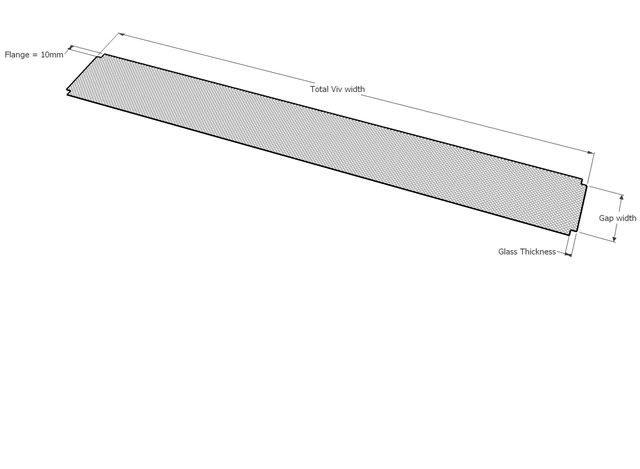
12. Top Vent retainer strips
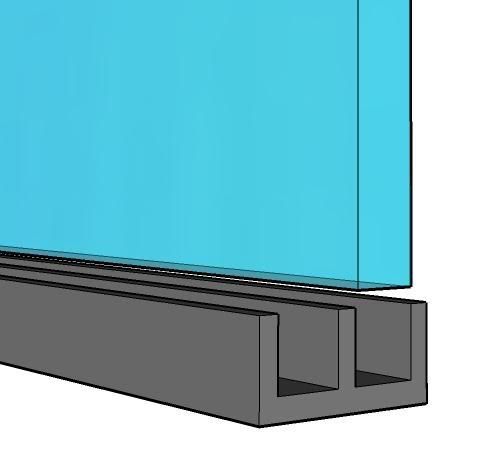
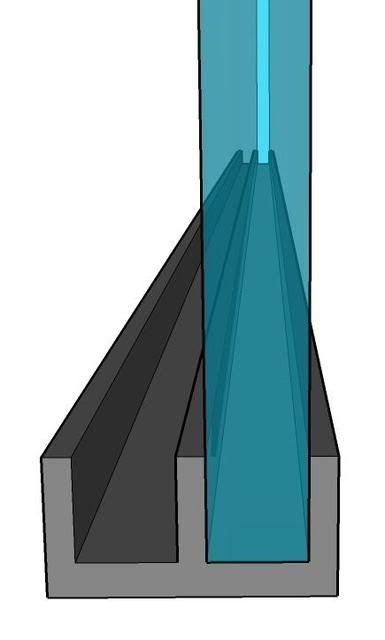
13. Door Channels
14. Doors
If you are going to install the optional false bottom, you can cut an arch (See Door Strut) in the bottom of the back piece, to allow access under the false base.
As each piece of glass is installed, you will need to apply a thin and adequate line of silicone to each inside edges of sheets that are being joined.
DO NOT wipe off any excess silicone that might squeeze to the outside edges of the glass. This can be cleaned up or trimmed later on, once the silicone has fully cured.
Step-by-Step Assembly Instructions
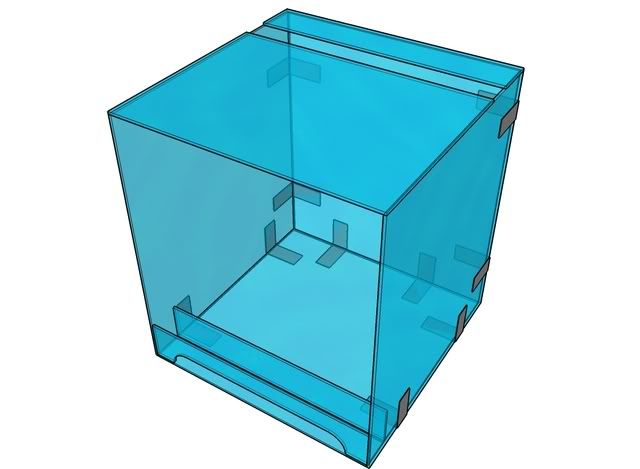
Prepare for assembly, by arranging your glass pieces in the order that you will need them and all other tools and materials within easy and comfortable reach. Make sure you know what the orientation of each piece is (use a marker to write on each piece) N.B. Keep all writing and marking at least 25mm from edges to be siliconed.
Example:
![Image]()
Ensure that your work surface is flat, sturdy, non-abrasive and that you have sufficient room, so that you can easily reach everywhere on the vivarium, once you start working.
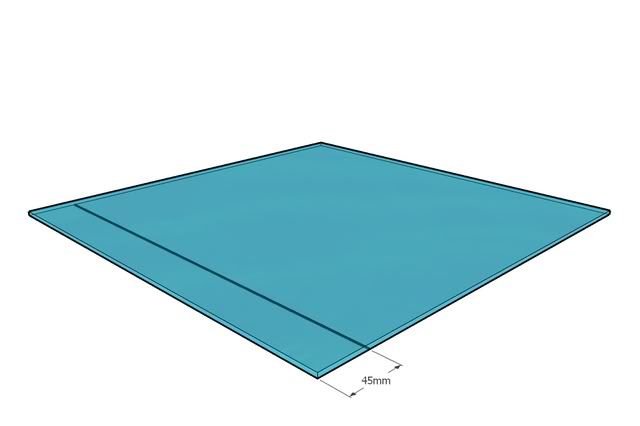
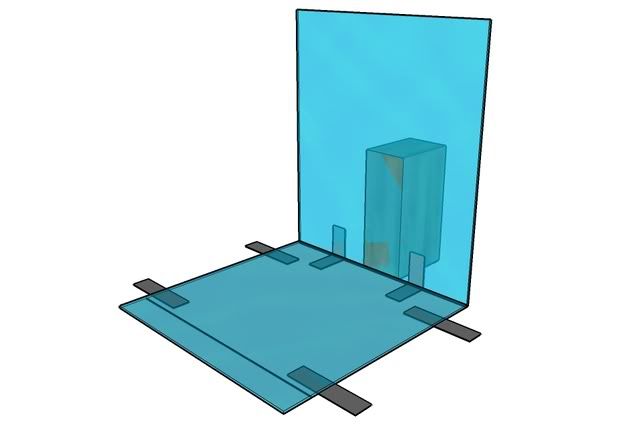
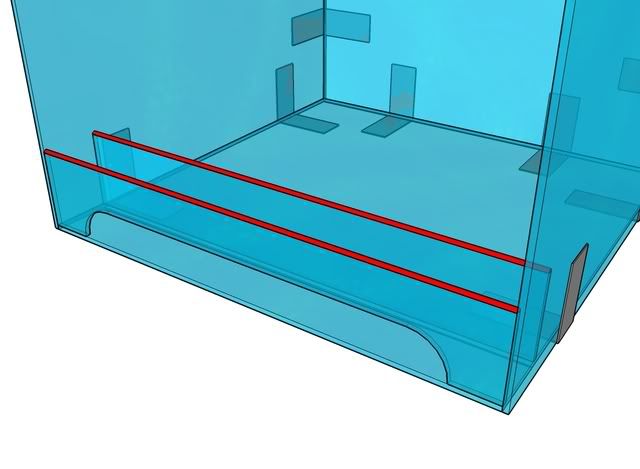
1. BASE
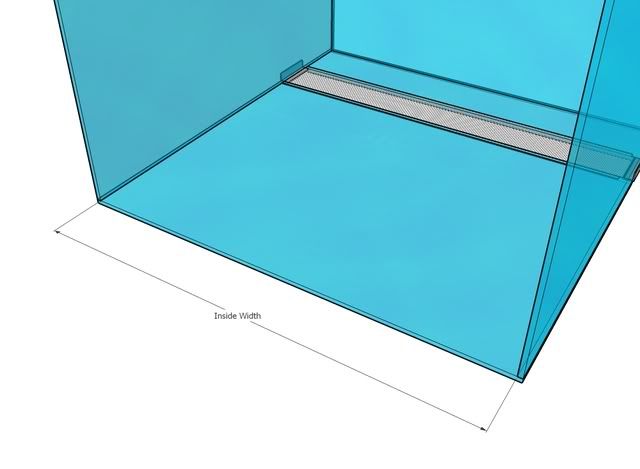
• Use a marker pen to draw a parallel line, 45mm from the front edge of the base.
• Then turn the base piece over, so that this line is now on the underside.
![Image]()
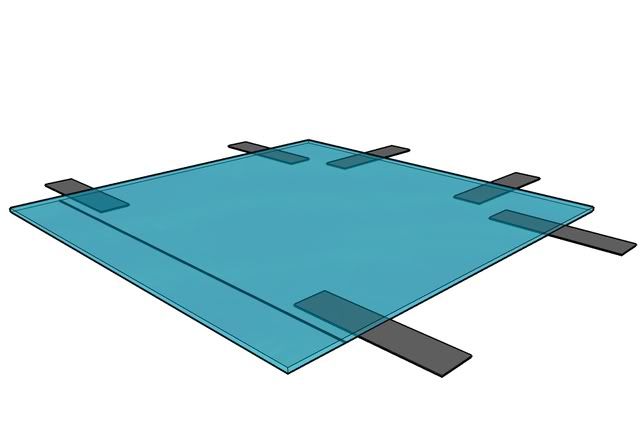
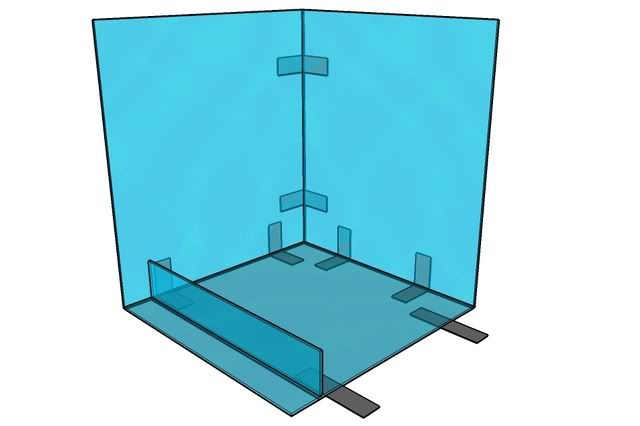
• Stick X6 pieces of tape on the underside of the base, with ½ of the tape still showing. (x2 pieces on the back edge and x2 pieces on each side edge), the sticky side should now be facing up.
![Image]()
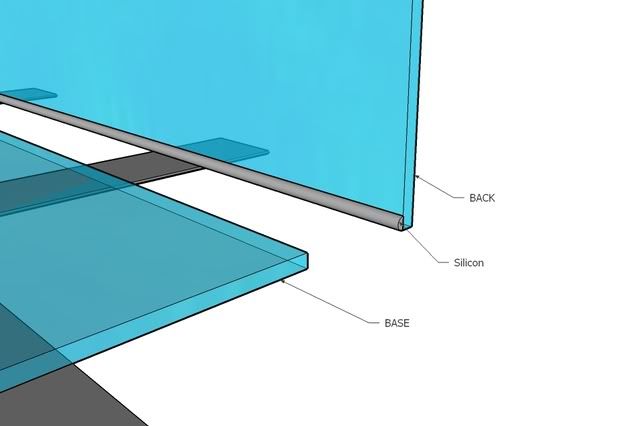
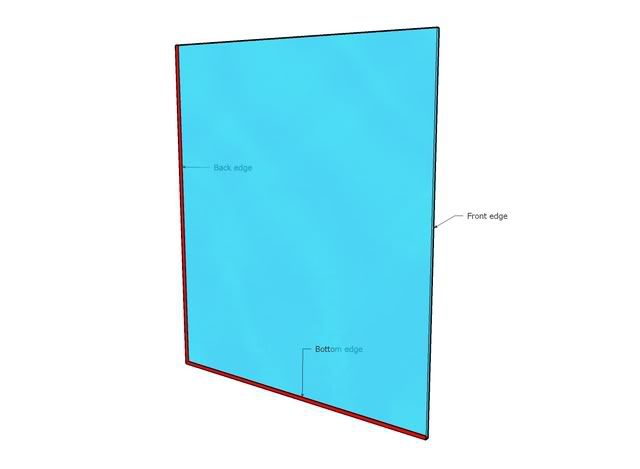
2. BACK
• Have the block of wood or cloth covered brick ready to support the back piece of glass.
• Apply a thin but sufficient bead of silicon along the bottom inside edge of the back piece.
![Image]()
• Carefully align the back piece to the outside back edge of the base.
• Press the back with a light, but firm pressure to bed it into the silicon.
• Use the Block or brick to support the back in the upright position.
• Use the Right angle or Square to check that the two pieces of glass are at right angles to each other.
• Fold the x2 pieces of tape upwards and stick them to the back; this will assist in keeping everything in the correct place.
![Image]()
![Image]()
Tip: This step is much easier to do with an assistant to hold the front glass pane upright and in place while you complete installation of the first side piece in the next step.
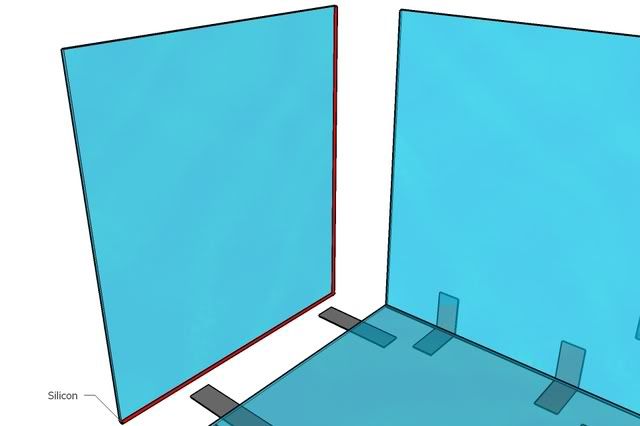
3. SIDE (Left-Hand)
• Apply a thin but sufficient bead of silicon along the bottom and back inside edges of the side piece.
![Image]()
• Carefully align the side piece to the outside side edges of the base and back.
• Press the side piece with a light, but firm pressure to bed it into the silicon.
• Fold the x2 pieces of tape upwards and stick them to the side; this will assist in keeping everything in the correct place.
• Use x2 pieces of tape and stick them across the back and side joint, this will assist in keeping everything in the correct place and in the upright position.
![Image]()
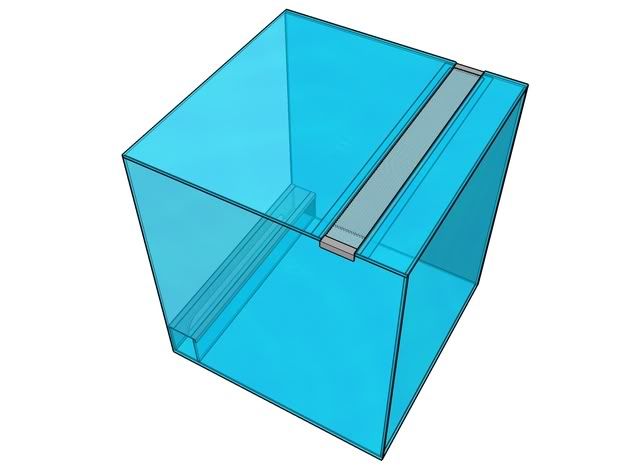
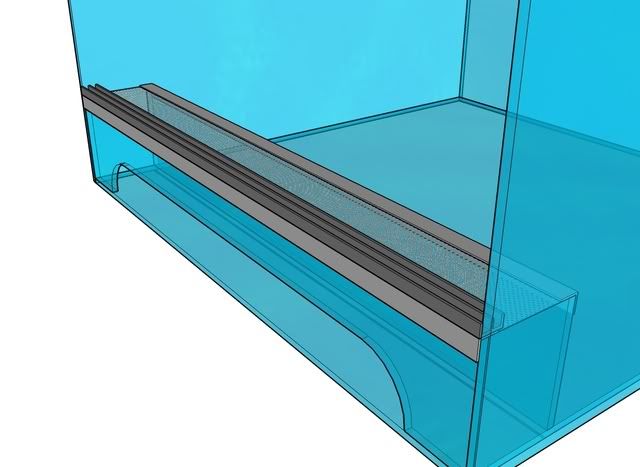
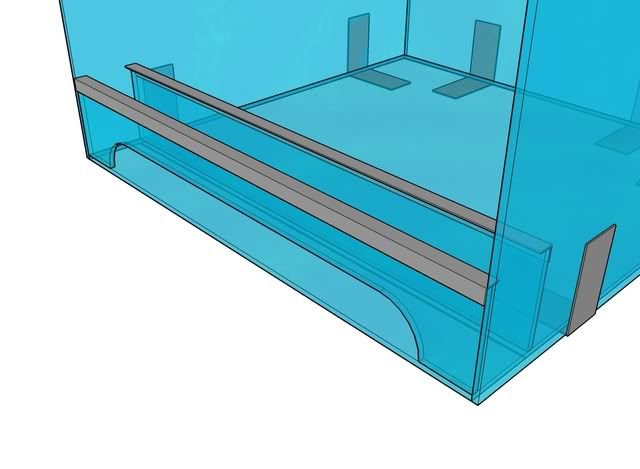
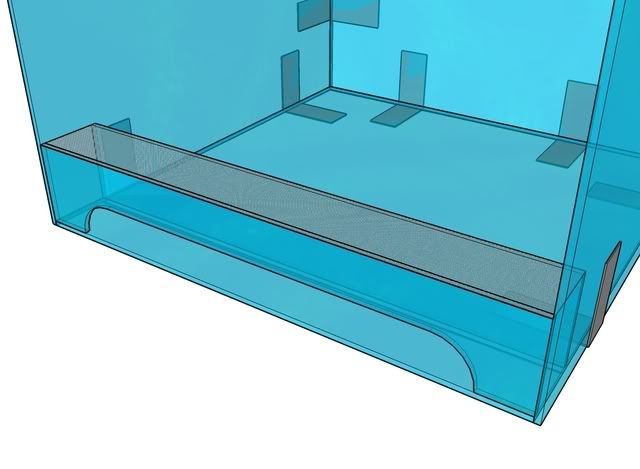
4. INSIDE RETAINING LIP
• Apply a thin but sufficient bead of silicon along the bottom and left hand edges of the retaining lip piece.
![Image]()
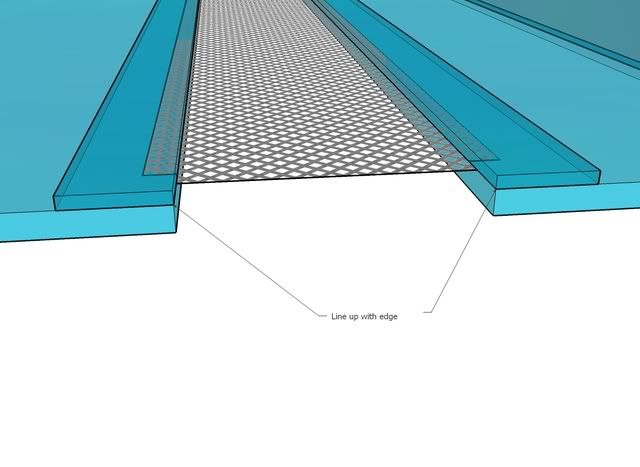
• Carefully align the retaining piece to the line drawn on the underside of the base.
• The retaining piece should be placed just behind the line and against the left side piece.
• Press the piece with a light, but firm pressure to bed it into the silicon.
• Use the Right-angle or Square to check that the retraining piece is at right angles to the base.
![Image]()
![Image]()
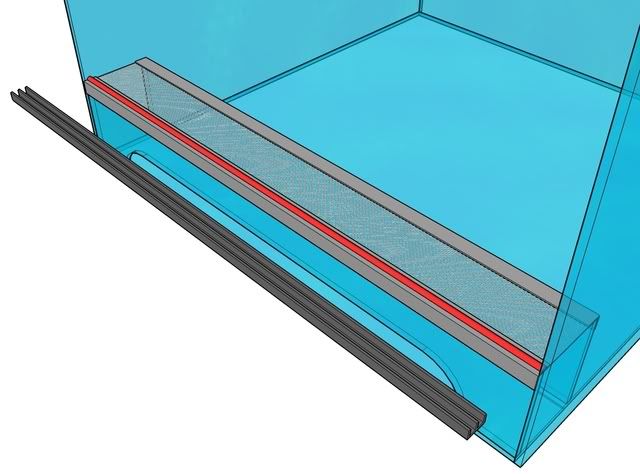
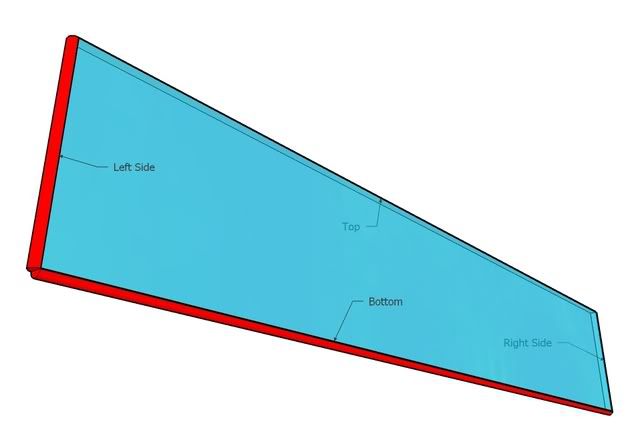
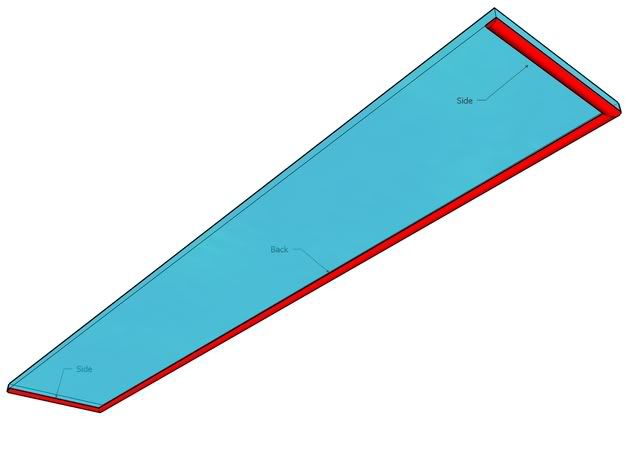
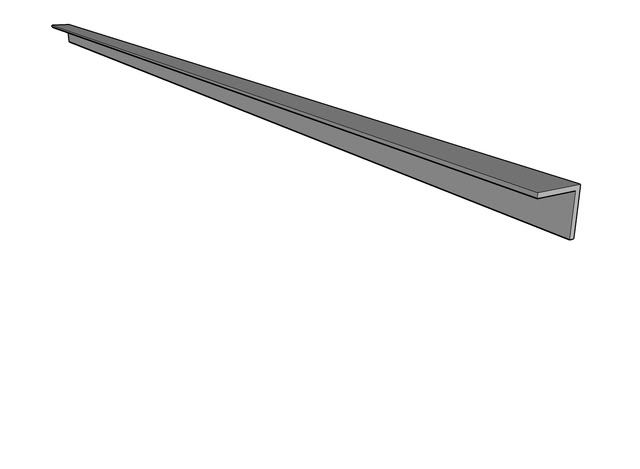
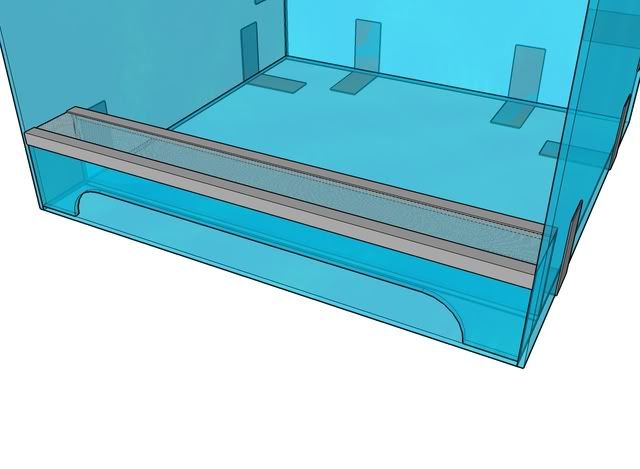
5. DOOR STRUT
• Apply a thin but sufficient bead of silicon along the bottom and left hand edges of the door strut.
![Image]()
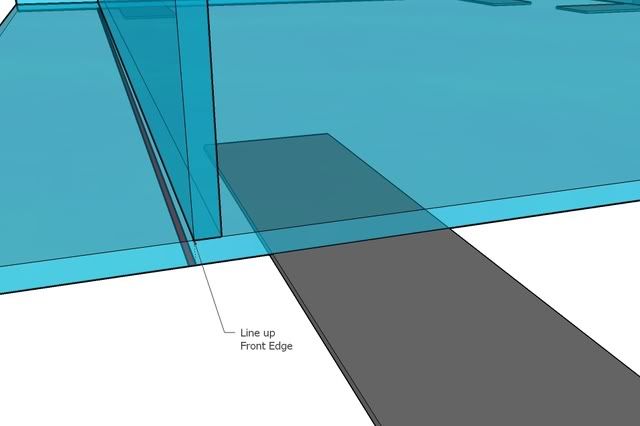
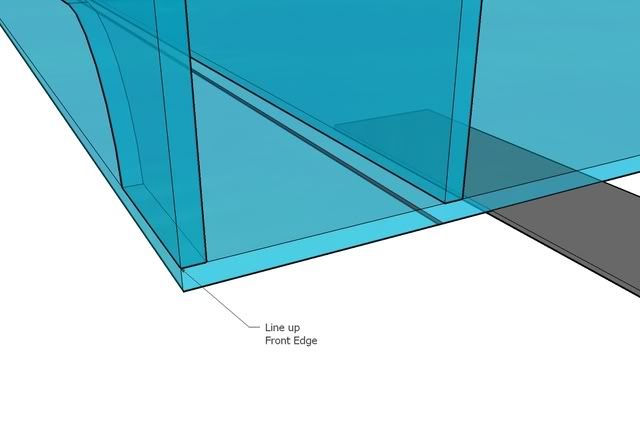
• Carefully align the door strut to the top front edge of the base.
• The door strut should be placed on the base front edge and against the left side piece inside front edge.
• Press the piece with a light, but firm pressure to bed it into the silicon.
![Image]()
![Image]()
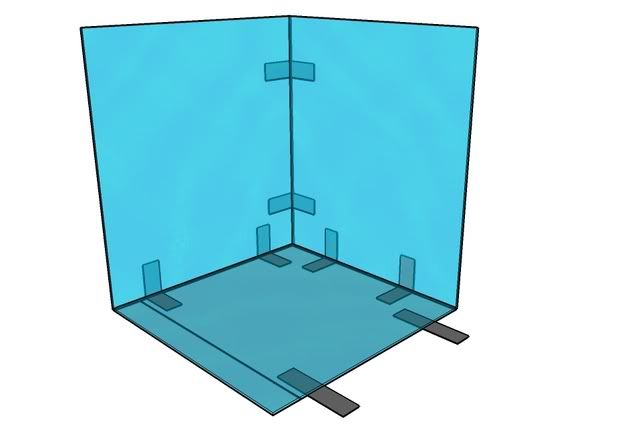
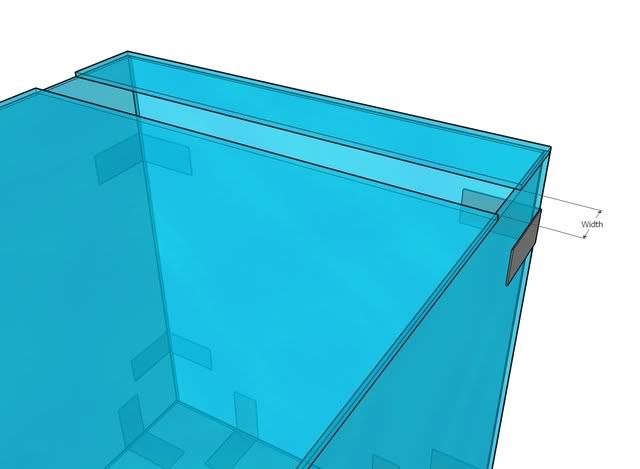
6. SIDE (Right-Hand)
• Apply a thin but sufficient bead of silicon along the side edges of the Door Strut and the retaining lip pieces.
![Image]()
• Apply a thin but sufficient bead of silicon along the bottom and back inside edges of the side piece.
![Image]()
• Carefully align the side piece to the outside side edges of the base and back.
• Press the side piece with a light, but firm pressure to bed it into the silicon.
• Fold the x2 pieces of tape upwards and stick them to the side; this will assist in keeping everything in the correct place.
• Use x2 pieces of tape and stick them across the back and side joint, this will assist in keeping everything in the correct place and in the upright position.
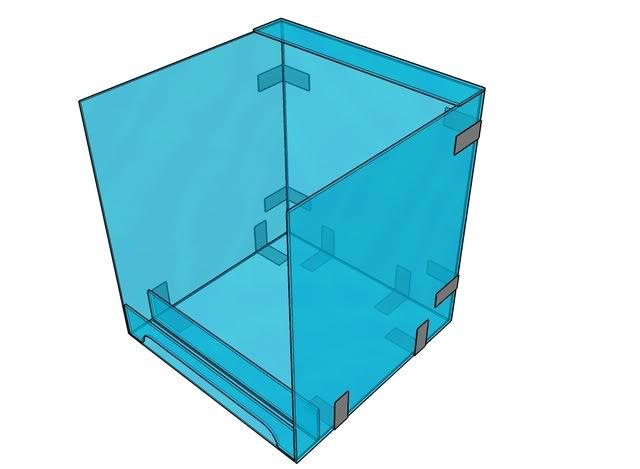
![Image]()
7. With most of the pieces in place and the vivarium constructed, run an adequate solid line of silicone into the joint areas on the inside, then run your finger over the silicone from one end to the other of each seam, preferably in one continuous motion, to smooth the silicone down and force it into the joint areas.
Tip: Dip your finger into a little water and dishwashing soap, before smoothing down the joints. (10 drops of soap in a glass of water)
I hope that you will find these useful.
I post each new section as I complete typing and doing the drawings.
This will be available in PDF format when complete.
DIY Glass Open Front Vivarium
By Darryl Le Grange
Introduction to Building Your Own Vivarium
If you want to try, building an open front vivarium from scratch, you will find this a challenge and satisfying as well. I have attempted to try and document this process as accurately as possible, from tips, materials list, pre-assembly instructions, and complete step-by-step directions on how to construct an open front vivarium from 4 mm glass.
Tips on Working with Glass
• Plan ahead: Prepare good schematic drawings, before cutting the glass. >> See Cut Size Calculator
• Insure a correct fit by using accurate measurements.
• I construct my vivariums with the two side pieces of glass and the back piece to fit on the outside of the base and the front door strut set on top of the bottom base sheet of glass. >> See Panel Placements Diagram
• Have a professional glazier cut and prepare your glass if you do not feel comfortable with cutting glass.
• Lightly rubbing down all the edges on the newly cut glass, with the emery cloth helps prevent small chips and you cutting yourself.)
• If at any time during construction you have trouble with the tape not sticking to the glass, just clean the area with some acetone on a paper towel and try again
• Use a glass pencil or a Marker pen to note the orientation on each piece of glass.
• Drill any holes for drainage and misting systems before assembly
Materials List
The glass components consist of 1 bottom, 1 back, and 2 sides, 2 top pieces of glass, 1 door strut, 1 retaining lip and 2 doors. (Optional – 1 False Base)
You will also need the following items to construct your vivarium.
• Sturdy, flat and non-abrasive surface to work on
• Single edged razor blades
• Acetone or methylated spirits
• A non-toxic 100% silicone sealant (Aquarium Grade)
• A roll of paper towels.
• A Glass pencil or marker pen.
• A roll of duct tape or a good quality masking tape
• Emery cloth or silicone carbide sandpaper.
• “E” profiled plastic (4mm) strips (Door Channels)
• “L” profiled plastic angle strips
• Fine Stainless Steel Mesh
• Small block of natural bees wax
• Good pair of kitchen scissors
• Thin latex or similar gloves
• Small Right-Angle or Engineers square
• 1x Large wooden Block or cloth covered Brick
• Small amount of dishwashing soap and water
• Small Polystyrene blocks (for optional False Base)
Pre-Assembly Preparations
• The door strut has an arch cut out of it, you can cut this free-hand or use a template, otherwise have this piece of glass cut by your local glazier.
• Once the pieces of glass are cut, using the emery cloth or silicone carbide sandpaper, buff all the raw edges of the glass just enough to take off the sharpness.
• Clean all the glass pieces joint areas and edges (any area where silicone will be applied) with acetone or methylated spirits.
• Cut strips of tape, at least 16 – 18 pieces, about 120mm long. Stick these to a clean surface, which the tape won't stick too much to, with at least half of the tape hanging freely. If you require more tape, cut these before installing another piece.
BEFORE you start to assemble your vivarium, it is important to know in what sequence the glass sheet are assembled.
The sequence is as follows:
1. Base
2. Back
3. Left Side
4. Inside Retaining Lip
5. Door Strut
6. False Base (Optional)
7. Right Side
8. Top “Back”
9. Top “Front”
10. Stainless Steel Mesh
11. Plastic Angle
12. Top Vent retainer strips
13. Door Channels
14. Doors
If you are going to install the optional false bottom, you can cut an arch (See Door Strut) in the bottom of the back piece, to allow access under the false base.
As each piece of glass is installed, you will need to apply a thin and adequate line of silicone to each inside edges of sheets that are being joined.
DO NOT wipe off any excess silicone that might squeeze to the outside edges of the glass. This can be cleaned up or trimmed later on, once the silicone has fully cured.
Step-by-Step Assembly Instructions
Prepare for assembly, by arranging your glass pieces in the order that you will need them and all other tools and materials within easy and comfortable reach. Make sure you know what the orientation of each piece is (use a marker to write on each piece) N.B. Keep all writing and marking at least 25mm from edges to be siliconed.
Example:
Ensure that your work surface is flat, sturdy, non-abrasive and that you have sufficient room, so that you can easily reach everywhere on the vivarium, once you start working.
1. BASE
• Use a marker pen to draw a parallel line, 45mm from the front edge of the base.
• Then turn the base piece over, so that this line is now on the underside.
• Stick X6 pieces of tape on the underside of the base, with ½ of the tape still showing. (x2 pieces on the back edge and x2 pieces on each side edge), the sticky side should now be facing up.
2. BACK
• Have the block of wood or cloth covered brick ready to support the back piece of glass.
• Apply a thin but sufficient bead of silicon along the bottom inside edge of the back piece.
• Carefully align the back piece to the outside back edge of the base.
• Press the back with a light, but firm pressure to bed it into the silicon.
• Use the Block or brick to support the back in the upright position.
• Use the Right angle or Square to check that the two pieces of glass are at right angles to each other.
• Fold the x2 pieces of tape upwards and stick them to the back; this will assist in keeping everything in the correct place.

Tip: This step is much easier to do with an assistant to hold the front glass pane upright and in place while you complete installation of the first side piece in the next step.
3. SIDE (Left-Hand)
• Apply a thin but sufficient bead of silicon along the bottom and back inside edges of the side piece.
• Carefully align the side piece to the outside side edges of the base and back.
• Press the side piece with a light, but firm pressure to bed it into the silicon.
• Fold the x2 pieces of tape upwards and stick them to the side; this will assist in keeping everything in the correct place.
• Use x2 pieces of tape and stick them across the back and side joint, this will assist in keeping everything in the correct place and in the upright position.
4. INSIDE RETAINING LIP
• Apply a thin but sufficient bead of silicon along the bottom and left hand edges of the retaining lip piece.
• Carefully align the retaining piece to the line drawn on the underside of the base.
• The retaining piece should be placed just behind the line and against the left side piece.
• Press the piece with a light, but firm pressure to bed it into the silicon.
• Use the Right-angle or Square to check that the retraining piece is at right angles to the base.
5. DOOR STRUT
• Apply a thin but sufficient bead of silicon along the bottom and left hand edges of the door strut.
• Carefully align the door strut to the top front edge of the base.
• The door strut should be placed on the base front edge and against the left side piece inside front edge.
• Press the piece with a light, but firm pressure to bed it into the silicon.

6. SIDE (Right-Hand)
• Apply a thin but sufficient bead of silicon along the side edges of the Door Strut and the retaining lip pieces.

• Apply a thin but sufficient bead of silicon along the bottom and back inside edges of the side piece.
• Carefully align the side piece to the outside side edges of the base and back.
• Press the side piece with a light, but firm pressure to bed it into the silicon.
• Fold the x2 pieces of tape upwards and stick them to the side; this will assist in keeping everything in the correct place.
• Use x2 pieces of tape and stick them across the back and side joint, this will assist in keeping everything in the correct place and in the upright position.

7. With most of the pieces in place and the vivarium constructed, run an adequate solid line of silicone into the joint areas on the inside, then run your finger over the silicone from one end to the other of each seam, preferably in one continuous motion, to smooth the silicone down and force it into the joint areas.
Tip: Dip your finger into a little water and dishwashing soap, before smoothing down the joints. (10 drops of soap in a glass of water)


")